Monday, 28 February 2022

February Update 2022


 I’ve been busy these last few months moving the layout from a central position in the loft room to the rear. This has involved creating a new control panel at the front and dismantling the entrance curve to the station. After doing this my back is very grateful as I no longer have to continuously duck under. Why did I wait so long to do this?  The extra space created in the centre of the room also gives me space to work easier without banging my head! The whole effort has been well worth it but it has taken quite some time. 

The layout can now be controlled from the front and the rear should this ever be required. Initially, when I started the layout,  I imagined possibly exhibiting but in reality as time has gone on I realise this will never happen and it will remain a home based layout. As such control from the rear is somewhat redundant now and the new control from the front will be the default. Setting up control from the front was for me a complicated exercise in electronics and extreme patience as I’m no electrician. However by taking my time I eventually managed to get everything to work to my satisfaction. I also took the opportunity to add polarity switches to all the points, this giving much better running. The layout is still in sections enabling me to move all the modules should I wish. This is useful I remind myself due to a loft hatch ( one very good reason) and should there be a house move for example, or even the offer of using a spare room ( I wish!) . 

The curve entering the station had to be rebuilt as the curve now approaches in the opposite direction. All scenics were removed to be reused and a whole new baseboard was created with detachable legs and, as with the rest of the layout, is a separate module. This new section features a slight embankment based on the approach to Lynton via Larkscleave bridge with the aim to build a replication of this bridge and the woods surrounding . So far the land formation is progressing using the old style chicken wire and plywood formers method . I did consider trying carving polystyrene but vetoed this having read too many reports of snow men being formed. So chicken wire it is with a covering in plaster bandaging (Mod Roc) begun. I’ll share pictures in my next post. Maybe I’m old fashioned in my approach but it works for me. I do hope the pictures capture the work achieved in the last couple of months. 

Sunday, 12 December 2021

 A very long overdue update 

 I cannot quite believe my last post was January 2020. Unfortunately my old series 2 I Pad crashed some time ago and this was my "Go 2 " for updates to the Blog. I've managed to rescue  the poor old thing today and  thought it was about time  I posted a little update on the layout.  I have been quite busy both on the home front , DIY and work but also fortunately, for sanity, with much  modelling.

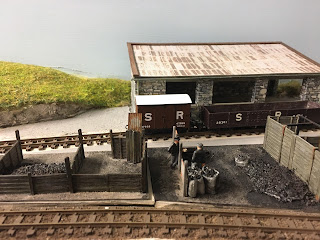
First on the list was that during the first lockdown I decided to try and replicate the coal staithes in the goods yard. There is not very much photographic evidence to model from and the trusted bible "Measured and Drawn does not cover this either, but from the few photographs that do exist I managed to conjure up my best efforts seen here. 


As you can  see there is much more detailing required yet, and the ballasting will wait until everything runs as smoothly as possible. All of which brings me to my next topic;  I've spent an enormous amount of time improving  the running of  the line and also adding a further control panel to the front of the layout. My "Master Plan 2021"  is to move the whole layout to the back wall of the loft giving me far less back ache and easier access to extend the layout in the future .So,  all of this will follow in my next posts. Until then.........     
    

Saturday, 25 January 2020

Heljan model at Lynton continued

A rather longer unedited video is presented here. As before I hesitated to show as there was much Id liked to have improved. Please excuse the incorrect platform seats as these were placed merely for effect. Much of the scenic detail is still under construction but at least you do see the improvement to the Heljan first generation model after undertaking the modifications described earlier. It wasn’t easy to hold the camera steady whilst controlling the model. At one point you will see a stall into the loco shed but with a second attempt and all seems well. I am pleased with the improvement to running made and now need to make the model complete with replacing the cow catchers, couplers and train crew.


Sunday, 24 November 2019

Heljan Lyn at the Warley model show

This weekend I was able to attend the Warley Model Railway show and take some pictures of the prototype Baldwin Lyn displayed on the Heljan stand. I was also reassured that the new Manning Wardle in the form of Lew ( shown here ) and Lyd have had the problems as seen with earlier production models rectified.
I hope that the pictures here of Lyn show what a very nice model we have to look forward to in 2020!


Heljan Manning Wardle running test

In my last post I explained how I attempted to improve the running quality of my first generation Heljan Manning Wardle model. The problem had been that the model refused to ride through the Peco points without derailing. This was way back in the Summer months. At the time I did take some videos of this improvement.The videos show Yeo negotiates all points very well but I was not totally happy with the video quality and intended to re shoot the sequence. Well as it turns out this improved video never saw the light of day so I have decided to show one of the original videos anyway. Something being better than nothing. Work on the layout has taken a little break for a while due to domestic work ( the DIY and decorating type) and work for a living!

I hope the short videos here help show the improvement in performance following the modifications mentioned in the previous post.

Monday, 5 August 2019

Upgrading the Pilton Ponies

I have never been totally happy with either the cab roof on Lew which was a horrible big lump of white metal, perhaps even a scale 6 inches thick , or my terrible attempt at the cylinder covers on my old original Chivers Lew and the Stennnig Taw. By pure chance,  whilst pottering in my spares box , I came across some very handy left- over parts from the Backwoods Manning Wardle Kits. A spare unused cab roof for Lew and two sets of cylinder covers. Never throw anything away !
So two evenings later - due in part to not understanding how white metal and brass don’t bond easily and I now have much improved looking models. The cow catcher on Taw ,which is the Langley kits version, fell off in the process but will be re attached now that the cylinder covers are in place.
The cow catchers are in fact a much sturdier design than those on the Heljan and I need to invest in a few more sets to replace those on the Heljan. My Heljan models have lost theirs repeatedly! The chivers model of Lew awaits the same.


Tuesday, 25 June 2019

Fixing a Heljan L&B 009 Manning Wardle

As mentioned in previous posts on this blog I purchased three of the new Heljan L&B Manning Wardle locomotive models. These  are to supplement my Backwoods ( built for me by Brian Love and one purchased on e bay) as well as my two originals built way back yonder from the Rodney Stenning and Chivers white metal kits. 
The Heljan models do look superb but it seems I’m not alone in finding that the performance of these models struggles over Peco points. The main issue seemed to be that the pony trucks would not cope with Peco points . Thanks to the internet I have followed a fix for the pony trucks. 
One of the theories being that the Heljan pony wheels are too fine scale and the pony trucks too light. My first modification has been applied to a first generation Heljan model of Yeo with the product code 99501. You can identify this first generation by the fact that the pony trucks don’t have any brass connectors that guide the pony trucks. This was a modification by Heljan to improve the problem of the pony trucks adopted to all the second generation models. I have two of these second generation models but my experience is that the modification does not seem to make much of an improvement to the same problem. That is the pony trucks seem to have a will of their own in negotiating my Peco “ Mainline” 18 inch radius points. So following what I write below I have modified my first generation Heljan and I’m very pleased to report that all issues have been rectified. The model runs beautifully across all points in all directions and very slowly. As my models will never run on the smaller radius Peco points I will, in addition to the pony truck modification remove the coupling attachment that is built into the pony trucks and add Greenwich couplings to the front and rear buffer beams. This seems to work perfectly well on the Backwoods models. 
So how to modify and get your Heljan working ? 
Shopping list ; 
1- Romford 8.00 mm metal wheels 6 hole Disc . I purchased mine from DUNDAS models ref: DW 82 
2- brass round Tube - 2.5 mm outside diameter 1.5 mm diameter . I bought mine from Eileen’s Emporium ref BRT 2515D. 
3- Superglue Gel 
Tools - X Acto metal cutting modelling saw and a table top Modellers’ vice. 

How to modify 
1- unscrew the pony truck and remove the Heljan wheel set from their lugs (?) They simply flip out. 
2- cut a length of brass Tube to 5-6 mm in length for each Romford axle to be inserted into.
3- remove each Romford wheel from their axle ( they slide off with a little subtle pressure by finger)!and cut off each pin point leaving an axle of approx 12 mm length . 
4 - add one Romford Wheel to its original cut down axle. 
5- insert axle into the brass Tube 
6- add second axle and using a back to back N gauge push fit the Wheels to correct back 2 back. 
7- push fit the new assembly into the lug vacated by the original wheel set.
8- super glue gel if desired can be added if required to help bind the brass to the lug - but I haven’t as yet and all seems fine. Total time taken per Pony truck was approx. 15 minutes.
I hope the following photographs help explain this simple but effective modification.